Hot Cross Buns

Hot Cross Buns

TBH, I’d planned my next post to present a vegetable side dish of broccoli. But yesterday the hot cross buns- Mom’s hot cross buns-emerged from the oven, all puffy and glistening, pushing all thoughts of broccoli right out of my head. 

Easter on the farm was much like other religious holidays; 20% religion and 80% traditional cultural practices. You know, the fun stuff. My youthful priorities for the holiday were: 

1. Wearing my new Easter outfit, if it was warm and dry enough. (It wasn’t.)

2. Running to check for the early arrival of the Easter Bunny. (Guaranteed.)

3. Eating hot cross buns for breakfast. (More than likely, yes.)

Actually, hot cross buns pre-date Christianity, originating in pagan religions. But they seemed such a fine fit for Good Friday, that they were co-opted as a symbol of Easter. But no matter how you view them historically, they remain a delicious holiday staple. 

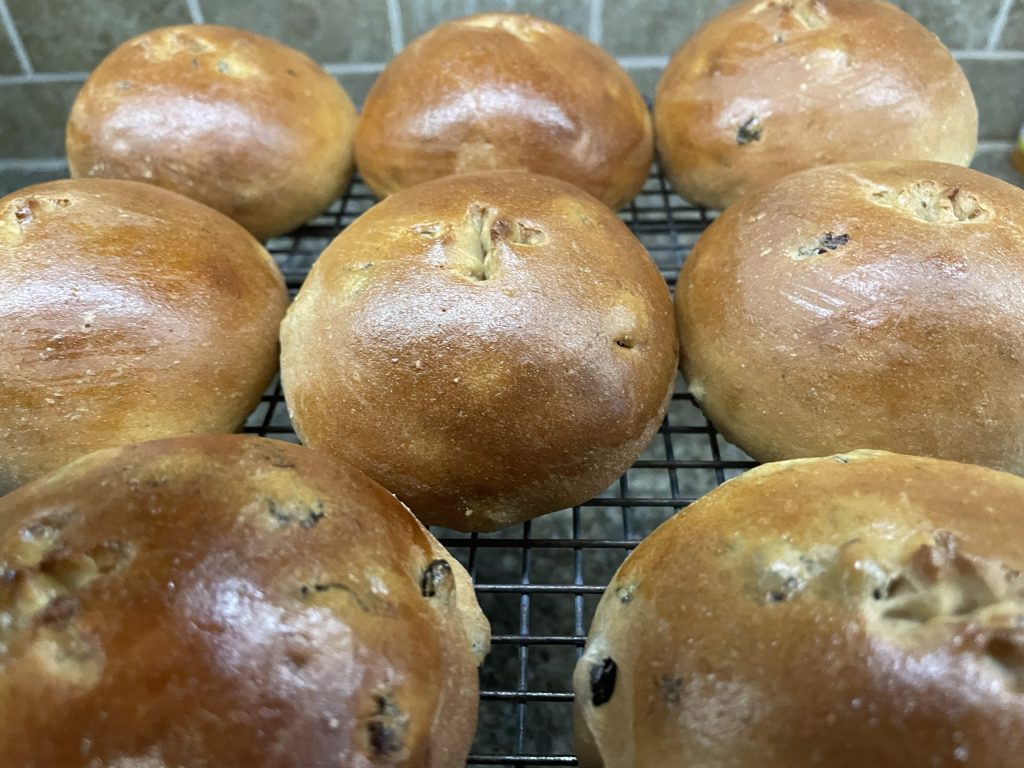
I have no idea where this recipe came from, simply a hand written recipe card with no credit given. But Mom’s hot cross buns were, and remain today, the best ones I have ever tasted, and I have tasted a few over the years. Beautifully risen, puffy and light, with just the proper amount of spice.

They are a bit of a splurge at our house, given the butter, white flour and icing. I will admit to trying to make them healthier in years past, but the quality is not the same and ultimately not worth it for a one time a year indulgence. This year I did have the remains of a bag of finely milled farro flour from my favorite local grains purveyor, Hayden Flour Mills. I blended the farro flour into my Sonoran white wheat for both flavor and color, but Mom used plain old all purpose flour, and that’s fine. And of course, I macerated the currents in brandy, of which Mom would not only approve, but would wonder why she didn’t think to do so herself…

Given the lateness of my inspiration, if you bake the buns it won’t be in time for Easter. But neither the holiday nor the buns will mind if they hit the table a bit late. I don’t think you’ll mind much, either. 

Hot Cross Buns

Puffy, tender sweet roll spiced with cinnamon and nutmeg, with a criss-cross of vanilla icing.
Prep Time2 hours 30 minutes
Cook Time20 minutes
Total Time2 hours 50 minutes
Course: Breakfast
Cuisine: English
Keyword: Easter
Servings: 8

Ingredients

  • 1 packet active dry yeast 1 packet is 2 1/4 teaspoons
  • 1/4 cup very warm water
  • 1/4 cup butter, unsalted
  • 1/3 cup milk I use oat milk
  • 3 tbsp sugar
  • 1/2 tsp salt
  • 1 large egg
  • 1/2 cup currants, dried
  • 1 tbsp brandy optional
  • 2 1/4 cups all purpose flour
  • 1/4 tsp ground cinnamon
  • 1/8 tsp ground nutmeg
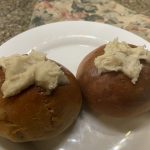
Icing

  • 1 1/2 tbsp butter, unsalted room temperature
  • 1/2 cup confectioner's sugar sifted
  • 1/2 tsp vanilla extract
  • milk

Instructions

  • Sprinkle the yeast into the warm water in a large mixing bowl. Set aside to proof.
  • If using the brandy, mix into the currants and set aside to macerate.
  • Melt the butter, then stir in milk, sugar and salt, stirring to dissolve the sugar. Cool, then stir into the yeast.
  • Beat the egg. Measure and reserve 1 tablespoon for brushing the buns before baking. Stir remaining egg into the yeast mixture, along with the currants.
  • Mix the flour with the spices. Add gradually to the yeast mix, adding just enough to make a soft dough. If additional is required, add by the tablespoon until the dough can be kneaded.
  • Turn out onto a lightly floured surface and knead until smooth and elastic, adding only enough flour to keep from sticking. The mixing and kneading can be done using a strong mixer with dough hook.
  • Place the dough into a lightly buttered bowl, brush top with butter and cover with a clean kitchen towel. Let rise in a warm place until doubled, about 1 hour.
  • Turn out and divided evenly into 8 pieces. Shape each piece lightly into a ball. Place the balls of dough onto a baking sheet lined with parchment paper. Cover and set aside to rise, about 45 minutes. Preheat the oven to 350 degrees F. Brush the risen rolls lightly with the reserved beaten egg.
  • Bake for 15-20 minutes, until puffed and brown. Cover with a sheet of foil if the rolls are browning too quickly.
  • Remove rolls from the oven and cool on a wire rack.
  • Beat the confectioner's sugar into the butter with the vanilla. Add milk by drops until spreadable consistency. Additional confectioner's sugar may be added as desired for a stiffer icing for piping. Spread or pipe onto the warm rolls.

Notes

  • Nutrition Facts:
  • Calories: 256
  • Total Fat: 5.1 g
  •    Saturated Fat: 2.6 g
  • Cholesterol: 55 mg
  • Sodium: 169 mg
  • Total Carbohydrate: 47.7 g
  •    Fiber: 1.9 g
  •    Total sugars: 19.8 g
  • Protein: 5.8 g

Coconut Cake with Broiled Brown Sugar Topping

Coconut Cake with Broiled Brown Sugar Topping

Will there be cake? 

I have asked this question each year when my birthday rolls around, for some time. But tbh, when my mom came to an age and stage where she no longer could bake my birthday cake, I caved on it. Somehow baking one’s own birthday cake seemed a bit odd. I also thought that the birthday cake I counted on was simply too much work…

The birthday cake was a big double layer white coconut cake with fluffy white frosting. Originally, Mom grated fresh coconut to fold into the batter and sprinkle atop the frosting. Which, as I remember, was quite an effort. Eventually she developed a shortcut; dried shredded coconut, soaked in water to moisten and remove most of the added sugar from the fruit. It was a luscious birthday cake, one which I anticipated every year. 

But this year I remembered another cake that Mom served whenever an easy quickly made cake seemed in order. The recipe came off the back of the Bisquick box. The very fact that Mom kept a box of Bisquick baking mix in the pantry was a miracle; the cake was the only baked good I remember her using it for. Her actual biscuits were scratch made with whole wheat flour and wheat germ. The baking mix cake was a simple yellow cake, but had a brown sugar, coconut and pecan topping, which was popped under the broiler til it browned and bubbled. If you happen to be of quite advanced middle age like me, you might remember the Bisquick Velvet Crumb Cake

So I decided that after all these years, at this year’s birthday- there would be coconut cake. Tradition would be tossed out the window though, since I was baking this thing for just me and my husband. No, the big cake would be morphing into an easy single layer coconut cake with that delicious coconut brown sugar topping. Too bad I didn’t come to this conclusion many years ago; it would have saved Mom a great deal of work…

Given the sweet broiled topping, I could reduce the typical amount of sugar in the cake. I helped myself to Mom’s trick, first lightly toasting the dried coconut to deepen the flavor.  Unsweetened shredded dried coconut is the norm in my kitchen today, soaked luxuriously in light coconut milk before going into the batter. Coconut oil eliminated the need for creaming and mixed up quickly with eggs, coconut flavored yogurt and a touch of rum. A combo of whole wheat pastry and almond flours provided a fluffy, delicate crumb. And the broiled topping took about five minutes. The cake was terrific, chock full of coconut flavor with a fine, delicate texture and sweet crunchy topping. The icing on the cake? The leftover slices freeze beautifully. 

Changing up treasured tradition is a hard sell for most of us. I probably shouldn’t have waited so long to try. But since I did, I’m pretty pumped that it worked out this well. Yes, there was cake. And in its own way, just as delicious as I remember. 

Coconut Cake with Broiled Brown Sugar Topping

Single layer coconut cake with fine, delicate crumb and crisp brown sugar coconut topping.
Prep Time45 minutes
Cook Time30 minutes
Total Time1 hour 15 minutes
Course: Dessert
Cuisine: American
Keyword: coconut
Servings: 10

Ingredients

  • 1/2 cup unsweetened shredded coconut
  • 1/2 cup light coconut milk
  • 1 cup whole wheat pastry flour
  • 1/2 cup fine almond flour
  • 1 1/2 tsp baking powder
  • 1/2 tsp salt
  • 2 large eggs
  • 1/3 cup sugar
  • 1/3 cup coconut oil
  • 1/3 cup coconut flavored yogurt
  • 1/2 tsp vanilla extract
  • 1/2 tsp coconut extract
  • 1 tbsp rum

Topping

  • 2 1/2 tbsp butter, melted
  • 1/3 cup brown sugar, packed
  • 2 tbsp cream I used plant based creamer
  • 1/2 cup unsweetened shredded coconut
  • 1/4 cup chopped pecans

Instructions

Cake

  • Preheat the oven to 350 degrees F. Spray a 9-inch round pan with cooking spray and line the bottom with a parchment paper circle. 
    Place the coconut in a small skillet over medium heat and toast to a light golden brown, stirring frequently. Pout the coconut into a small bowl and mix in the coconut milk. Set aside to soak while prepping the remaining ingredients. 
    In a medium bowl, stir together the flours, baking powder and salt. 
    In a large mixing bowl, beat the eggs, sugar and oil until well combined and frothy. Stir in the yogurt, extracts and rum. Alternately stir in the soaked coconut mixture with the dry ingredients until no streaks remain, but don’t over mix. 
    Pour the batter into the prepared pan and bake for 25-30 minutes, until a toothpick inserted in the center comes out clean. Cool the cake in the pan until ready for the topping. 

Topping

  • Stir the topping ingredients together and spread evenly over the top of the cake, all the way to the pan edges. Broil approximately three inches from the heat til bubbly and brown, approximately three to five minutes. 

Notes

  • Nutrition Facts
  • Total fat: 24.7 g. 
  • Saturated fat: 14 g
  • Cholesterol: 41 mg
  • Sodium: 161 mg
  • Total Carbohydrate: 26 g
  • Fiber 3.7 g
  • Sugar: 13.5 g
  • Protein: 6.1 g

Sautéed Apple Slices

Sautéed Apple Slices

You can take the girl off the farm, but you can’t take the farm out of the girl… 

Pumpkin spice has made a valiant effort to convince folks that it is the harbinger of autumn. But the farm girl in me knows better, because autumn is all about the apples. I thoroughly enjoyed a recent trip back to the old southwestern Ohio hometown, including a stop at Fulton Farms, a local farm and market operation. The produce specialties through the summer here are luscious strawberries and right-off-the-stalk sweet corn, but it’s September now and it’s all about the apples.  

Apples have played a significant role in farm communities through many generations. I would wager that on the farm, we ate more apples than any other fruit because they “keep” for some time in their fresh form, and can be preserved in so many additional forms. Mom’s freezer applesauce was a staple in our meals throughout the winter. Apples can be canned or dried for longer storage and rehydrated for compotes, smoothies and baking.  They can also be pressed into delicious fresh cider. One just might let the cider “turn” a bit for a tangy hit of hard cider. One of the ways that midwestern farm kids get early access to the booze! Maybe this was the start of my penchant for adding a touch of liquor to my recipes-and yes, today’s recipe is no exception…

Many varieties were on display that day at the farm market, so many that it was tough to make a choice. But choose I did, and munching on them for breakfast brought to mind my recipe for sautéed apple slices. This is one of my quick and easy desserts, making an appearance without the need for planning and/or shopping in advance. I usually have a few apples in my hydrator drawers, and the cooking takes just minutes. The thinly sliced apples are sautéed in butter and brown sugar for sweet richness, then spiced with cinnamon, cardamom, and nutmeg. A touch of bourbon deepens the flavor and a small hit of white miso tempers the sweetness. I find it reminiscent of apple pie without the pastry. My taste buds might whine a bit about that, but my waistline is appreciative. Should my need for pastry be desperate, I can always tuck in several of my mini almond shortbread. More typically, we top the apple saute with a dollop of plain yogurt sweetened with honey. 

You needn’t have been raised on a Midwestern farm to enjoy the delicious diversity of apples. No matter your locale, you can bypass the pumpkin spice drive through and  head home with a couple of apples for a quick dessert of sautéed apple slices.  

Sautéed Apple Slices

Buttery saute of apples with brown sugar, currants and autumn spices.
Prep Time15 minutes
Cook Time15 minutes
Total Time30 minutes
Course: Dessert
Cuisine: American
Keyword: apples, cinnamon
Servings: 4

Ingredients

  • 2 large apples I use Fuji
  • 1 tbsp butter
  • 1 tbsp brown sugar
  • 3/4 tsp ground cinnamon
  • 1/8 tsp ground cardamom
  • 1/8 tsp nutmeg
  • 1 tbsp bourbon can substitute apple juice
  • 1 tsp white miso
  • 3 tbsp currants can substitute raisins
  • 1/2 tsp vanilla extract
  • 1/4 cup chopped walnuts

Instructions

  • Peel, core and thinly slice the apples. In a medium skillet, melt the butter over medium heat. Stir in the brown sugar and spices. Add the apple slices and stir to coat. Stir in the bourbon, miso and currants. Reduce heat to simmer, cover skillet and cook for 10-15 minutes, or until apples are tender. If there is more juice than desired, turn up the heat to reduce. Stir in the vanilla and walnuts, remove from the heat and serve.

Notes

  • Nutrition Facts
  • Calories: 159
  • Total Fat: 7.8 g
  • Saturated Fat: 2.1 g
  • Cholesterol: 8 mg
  • Sodium: 75 mg
  • Total Carbohydrate: 20.7g
  • Fiber: 3.8 g
  • Total sugars: 15.3 g
  • Protein: 2.5 g

Spicy Buckwheat Pumpkin Bread

Spicy Buckwheat Pumpkin Bread

One might imagine that we grew our own pumpkins on the farm, which would be a bad assumption… 

Daddy didn’t grow them, and no one in the kitchen seeded, roasted, peeled, pureed, drained or strained them. After all, Mom could write “pumpkin” on the grocery list and an orange can of perfectly prepared plain pumpkin puree would magically appear in the pantry. She could sweeten and spice it to her heart’s content for our holiday pies.

So I was a bit taken aback at my husband’s plan to make it ourselves. Granted, we did receive a hefty pumpkin in our community supported agriculture share. While most members would carve that squash for Halloween, he had been assured by the CSA staff that properly prepared, it would make fine puree for pie, soup, bread, whatever. When I suggested that we just use it on the porch for decoration, he suggested right back that we may as well send out party invitations to the javelinas. And, while I am most reticent to admit it, he was right. 

Which meant that we would in fact be seeding, roasting, peeling, pureeing, draining and straining that pumpkin. And now, weeks later, we have a considerable number of neatly packaged containers of frozen pumpkin puree hogging up space in our tiny freezer. 

While I am quite fond of pumpkin and its compatriot spices, I am decidedly not a fan of what the market calls “pumpkin spice.” Most commercially prepared products with that moniker are much too sweet and artificial tasting for me. However, I did not have a standard recipe for pumpkin bread. So I began by comparing various quick bread recipes in order to develop one I would enjoy. Again, most of these were too sweet, given my efforts to enjoy baked goods with less sugar. A gluten free recipe for pumpkin bread with buckwheat flour from Alice Medrich’s Flavor Flours caught my attention immediately, though. The earthy, nutty flavor profile of buckwheat might tone down the over enthusiasm of pumpkin spice…

I got to work making a buckwheat pumpkin bread replacing butter with oil, using wheat flour and reducing sugar. After a number of trials, my spicy buckwheat pumpkin bread came out of the oven and I was hooked. Don’t worry about the trials-there was more than enough pumpkin to make dozens of loaves of pumpkin bread…

Our favorite way to enjoy this bread is for breakfast, slathered with cream cheese and sprinkled with toasted chopped pecans. Sandwiched together with cream cheese and freshly chopped ginger, it makes terrific little sandwiches. I wouldn’t hesitate to top it with a dollop of whipped cream and call it dessert, either. It slices beautifully and freezes well. Wrapped in packages of two slices each, we can pull precisely the amount from the freezer that we want. A full loaf makes a great gift or bake sale item for the holidays, too. 

Now I don’t know how you obtain your pumpkin puree. But however that may be, I hope you’ll put some in this spicy quick bread.

Spicy Buckwheat Pumpkin Bread

Sweet and nutty pumpkin bread, tempered with the earthiness of buckwheat.
Prep Time40 minutes
Cook Time40 minutes
Total Time1 hour 20 minutes
Course: Breakfast, Dessert, Quick Bread, Snack
Cuisine: American
Keyword: Buckwheat, pumpkin
Servings: 16

Ingredients

  • 1/3 cup vegetable oil I use avocado oil
  • 1/2 cup brown sugar
  • 3/4 cup pumpkin puree
  • 2 large eggs
  • 1/3 cup plain yogurt
  • 1 tsp vanilla extract
  • 1 1/4 cup flour, part white whole wheat as desired
  • 1/2 cup buckwheat flour
  • 1/2 tsp baking soda
  • 3/4 tsp baking powder
  • 3/4 tsp salt
  • 1 tsp cinnamon
  • 1/4 tsp nutmeg
  • 1/4 tsp ground cloves
  • 1/8 tsp ground cardamom
  • 1/2 cup chopped, toasted pecans

Instructions

  • Preheat oven to 350 degrees F. Grease and flour an 8 ½ x 4 ½-inch loaf pan. 
  • Combine the dry ingredients: flours, baking powder, baking soda and spices. 
  • In a large mixing bowl, beat the oil, brown sugar and eggs together until thickened and lighter in color. Mix in the pumpkin puree, yogurt and vanilla. Gradually add the dry ingredients, mixing until well blended and smooth.  Stir in the pecans. 
  • Pour batter into prepared pan and bake until a toothpick inserted in the center comes out clean, approximately 35-40 minutes.  Place pan on a cooling rack and cool slightly in the pan, 20-30 minutes. Then turn out onto the cooling rack. Allow to cool completely before slicing. 

Notes

  • Per slice: 90 calories.  
  • Total fat: 2.2 g    
  • Sat fat: .05 g
  • Cholesterol: 21 mg.  
  • Sodium: 14 mg
  • Total Carbohydrate: 15.4 g   
  • Fiber: 1.9 g.  
  • Total sugars: 5.7 g  
  • Protein: 3 g

Roasted Fruit with Mini Almond Shortbread

Roast Fruit with Mini Almond Shortbread

“What do you think of when you hear the word dessert? Does your mind automatically go to ice cream, cookies, pies, or other decadent treats?… Let’s reset our thinking and consider fresh fruit — served without any preparation or garnishes — as dessert, shall we?”

https://www.thekitchn.com/in-defense-of-fruit-for-dessert-221163

Christine Gallery

Health minded folks have tried to hawk this concept to the American public for years…upon years…

Please note that the author of this piece was raised in a culture that did not include many sweets other than fresh fruit. I, on the other hand, was raised in a midwestern farm culture where high quality fresh fruit was relatively sparse, while ice cream, cookies, pies and other decadent treats were around in abundance. The particular abundance on the farm leaned toward dairy and egg based desserts such as custards, bread pudding, trifle and cream puffs… 

My first exposure to fresh fruit as dessert was at Schiavone’s, a local Italian fine dining restaurant. After you had stuffed yourself with whatever rich Italian-American dish you’d ordered, a platter of fresh fruit appeared. As I recall, though, that platter also held nutmeats and slices of delicious cheese, the requisite fats needed to fulfill the potential of all that fresh fruit! Which is pretty much where I am at today. Yes, a dish of fresh figs is amazing, when tossed with goat cheese crumbles and pistachios, then drizzled with honey. Super sweet dates are luscious, split open and stuffed with almond butter and chocolate chips. And the list goes on. Is it fresh fruit? Yes, but accompanied by sweet and fatty friends. 

It just needs a little something- a bit of sweetness, a bit of richness, a hit of acidity. Whatever, you can fill in the blank for your own taste preferences. Today I’m filling in the blank with a hint of honey, a touch of fat, spices and balsamic vinegar. All mixed into the fruit before it roasts in the oven for just a few minutes, softening it and bringing out all the caramel notes that fresh fruit desperately tries to keep hidden. The roasted fruit is sometimes a dessert all on its own, but I often nestle in a few tiny almond shortbreads, cut out using Mom’s container of miniature cookie cutters. 

The roasting technique is versatile, working well with whatever seasonal fruit one might have. Summer fruits like berries, peaches, cherries and figs? Check. Fall and winter fruits like grapes, pears, apples? Check. I sometimes add chopped nuts into the mix to be roasted, other times the finished fruit might be topped with a nut cream, or whipped cream. Or it might be just plain roasted fruit. The shortbreads freeze well and are easy to grab from the freezer to enrich the fruit when one so chooses.

My conclusion is that for this time in my dietary life, fruit-as-dessert is not ready for a solo gig. I could get there, it is possible, but how likely is that? People only live so long, y’know? 

Roast Fruit with Mini Almond Shortbread

A dish of lightly caramelized roasted fruit, enriched with tiny almond shortbread cutouts.
Prep Time30 minutes
Cook Time30 minutes
Total Time1 hour
Course: Dessert
Cuisine: American
Keyword: almond, fruit, shortbread
Servings: 4
Calories: 196kcal

Ingredients

Roasted Fruit

  • 3 cups fresh fruit, peeled as needed
  • 1 tbsp honey
  • 2 tsp neutral oil (I use avocado oil)
  • 1 tbsp balsamic vinegar
  • 1 tsp lemon zest
  • 1/2 tsp ground cinnamon
  • 1/4 tsp ground cardamom
  • 1 pinch ground cloves

Mini Almond Shortbread

  • 1 tsp flax meal
  • 1/3 cup almond flour
  • 3 tbsp white whole wheat flour
  • 1 tbsp sugar
  • 1 tbsp neutral oil
  • 1 pinch salt
  • 1/8 tsp baking powder
  • 2 drops almond extract
  • 1 1/2 tsp milk of choice

Instructions

Roasted fruit

  • Preheat the oven to 375 degrees Fahrenheit.
  • Cut the fruit into pieces appropriate to the fruit being used, generally 1/2 to 3/4 inch pieces.
  • Toss with remaining ingredients and spread out in a greased baking dish. Roast in the preheated oven for 15-20 minutes, until juices are released and fruit is tender and starting to caramelize. Remove from the oven and set aside to cool slightly.

Mini Almond Shortbread

  • Preheat the oven to 350 degrees Fahrenheit. Line a baking sheet with parchment paper, or grease lightly.
  • In a small cup, mix the flax meal with 2 teaspoons of water and set aside to gel.
  • Combine the flours, sugar, salt and baking powder in a small mixing bowl. Stir in the oil, extract and vinegar or milk. Mix to a soft dough. Roll out to 1/4-inch thickness, and cut with small shaped cutters or into 1/2-inch squares. Place cut outs onto the prepared baking sheet and bake for 10 minutes, til set ad lightly browned on the bottom.

To Serve

  • Toasted chopped nuts (optional)
    Whipped cream/cashew cream (optional)
    To serve, spoon the roasted fruit into serving dishes. Tuck 4 mini shortbreads into the serving of fruit. Top with desired garnish, if desired. 

Notes

  • Total Fat: 10.4 g
  •     Sat Fat: 1.2 g
  • Cholesterol: 0.0
  • Sodium: 2 mg
  • Total Carbohydrate: 25.4 g
  •      Fiber. 2.7 g
  •      Added sugars. 16.8 g
  • Protein: 3.1 g

Abruzzi Hazelnut Chocolate Cake

Abruzzi Hazelnut Chocolate Cake

I have an uncanny memory for the source and location of recipes. Not a skill set that will ever make me rich, I suspect, but handy in the kitchen, given that I easily own at least one hundred cookbooks plus magazines, notebook, recipe box. Let’s see… Is it in the recipe box? A particular cookbook? A magazine? It’s rather like a database in my head. It doesn’t help much, however, when one remembers that the desired recipe is in a small, worn and tattered paperback that belonged to one’s mother-in-law, when the cookbook no longer sits on the shelf. Abruizzi Black Cake was the only recipe we made from this particular volume, and when the book fell apart, it was discarded. Probably. This happened long enough ago that I don’t really have a clue what happened to it, to be honest. 

Would the internet come to my rescue, yet again? Keying in “Abruizzi Black Cake,” the first hit was for a web service entitled Eat Your Books. (https://www.eatyourbooks.com) An organized  place where one can document their collection of cookbooks online, then search digitally by recipe, ingredient, etc. Which I never knew I needed, given my uncanny memory for exactly the same thing. On the site, I could see just enough to know that the recipe came from The Home Book of Italian Cooking, (https://www.amazon.com/Mama-Mia-Italian-Cookbook-Cooking/dp/0883652161 and contained hazelnuts, chocolate and pantry ingredients. And yes, I already knew that much. But given that I no longer had the book, the remainder of the recipe would remain a mystery for the ages. Unless I wanted to hunt the book down and order it. Which I didn’t, because really, all I wanted to do was bake a cake… 

Never one to admit defeat, I simply made a cake. I mostly remember that we had made this cake for company, it included hazelnuts and dark chocolate and was well liked by all. I suspect the cake I turned out is not remotely like the original, which I recall as being richer and denser. Given the title, it probably had considerably more chocolate, melted and mixed throughout the batter. It was probably made with butter… but as long as I was starting from scratch, so to speak, I may as well make it with my preferred olive oil. My version is also lightened with well beaten eggs, minimal sugar and applesauce substituted for part of the oil. 

My cake, now renamed Abruzzi Hazelnut Chocolate Cake, turned out to be light, moist and delicious, redolent with the richness of nuts and the slight bitterness of dark chocolate. The top is drizzled with chocolate glaze, a riff on a recipe from www.food.com. (https://www.food.com/recipe/chocolate-glaze-that-hardens-when-cool-155392) Topped with a sprinkle of chopped hazelnuts, it is a beautiful cake.  Quick and easy to make, with a better nutrition profile, too. Slices are wrapped and nestled into my freezer, waiting to be the night’s dessert. Maybe at some point I’ll change my mind on ordering the paperback, but for now I’m making this cake when I crave that yummy Italian Nutella flavor combo.

Abruzzi Hazelnut Chocolate Cake

Light yet rich hazelnut chocolate cake, glazed with chocolate and sprinkled with hazelnuts.
Prep Time35 minutes
Cook Time25 minutes
Total Time1 hour
Course: Dessert
Cuisine: Italian
Keyword: cake, chocolate, hazelnut
Servings: 10

Ingredients

Cake

  • 2 large eggs
  • 1/2 cup sugar
  • 1/3 cup olive oil
  • 1/4 cup applesauce
  • 1/2 tsp vanilla extract
  • 1 cup whole wheat pastry flour
  • 1/2 cup almond flour
  • 1/4 cup hazelnuts, ground to meal consistency
  • 1 1/2 tsp baking powder
  • 1/4 tsp salt
  • 1/2 cup almond milk
  • 2 1/2 oz dark chocolate, shaved

Glaze

  • 1 tbsp coconut oil
  • 1 1/2 tbsp cocoa powder
  • 1/2 cup confectioner's sugar
  • 1/2 tsp vanilla
  • 121/2 to 3 tbsp hot water

Garnish

  • 2 tbsp finely chopped hazelnuts

Instructions

  • Preheat the oven to 350 degrees F. Lightly grease and flour a 9-inch round cake pan and set aside.
  • Combine the eggs and sugar in mixer bowl and beat on medium speed until light and fluffy. Mix in the olive oil, applesauce, and vanilla. 
  • Combine the flours, hazelnuts, baking powder, and salt. Using low speed, add gradually to the mixer bowl alternately with the almond milk to make a well mixed batter. Fold in the shaved chocolate by hand, then pour the batter into the prepared pan.
  • Bake for 20-25 minutes, until a toothpick inserted in the center comes out clean. Remove to a cooling rack. When cake is cool, run a table knife around the edge, then turn the cake out onto a serving plate.
  • Mix the confectioner’s sugar with the cocoa powder. Stir in the coconut oil and vanilla. Slowly stir in the hot water until a pourable consistency is reached. Drizzle over the cake in a decorative pattern, then sprinkle with the chopped hazelnuts. 

Crepes with Roasted Balsamic Berries

Crepes with Balsamic Roasted Berries

Listen to the soft calls of the mourning dove and bright chirp of the bobwhite. These were the summer sounds I heard each morning, waking to the sun streaming in my east window.  Mornings like this meant I was probably on school break, no early morning commitments or rushing to make the school bus. It also meant that Mom was likely in the kitchen, with breakfast on the go. And on the best mornings, she was making crepes.

Crepes are super thin, egg rich pancakes, originating in France. Made without sugar, they are delicious on their own, with butter and maple syrup, which is how Mom served them for breakfast.  I always envied the ease with which she rolled hers into neat cylinders, the syrup pooling around the edges. Crepes also provide a neutral canvas for both savory and sweet applications, ranging from combinations of creamed vegetables and proteins to dessert crepes with sweet, creamy fillings. The “in or out” status of the crepe varies with time here, it seems. Restaurants with the entire menu consisting of crepes with various fillings and toppings have been popular at various points in my life. And yes, there was an appliance at one time called the crepe maker. While not particularly in vogue at the moment, I can always order them at our local French bistro, where they never go out of style. Or get out my trusty seasoned cast iron skillet and make them myself.

Crepes are versatile pancakes. I’ve made absolutely beautiful crepes from buckwheat, oat, whole grain and white flours. They are a bit tricky to make the first time, though. The batter is quite thin, and quickly poured and swirled to coat the bottom of the skillet. I use an 8-inch cast iron skillet; much larger and you might end up with scrambled crepes! Slide a narrow spatula underneath one edge to the middle, then a quick flip. You’ll find many recipes with varying proportions of eggs to flour to liquid, affecting how easy this process is. Mom’s recipe was particularly delicate as she emphasized the egg with less flour and milk. The recipe I’m posting has a bit more flour and milk, allowing it to swirl easily in the pan, while being simpler to flip.  Can one make them plant based? I have made them successfully with Just Egg, though they are more delicate and harder to flip. There are vegan versions, which omit the eggs completely, but I’d have a tough time calling those crepes…

The ones I’ve prepared today are filled with Greek yogurt, and topped with a balsamic roasted berry medley. A sprinkle of toasted almonds results in a high protein breakfast that fuels me throughout the morning. The same bird sounds wake me these days, along with the raucous call of the Gambel’s quail. Sun still streams in the window, but the only way there will be crepes for breakfast is if I make them… 

Crepes with Balsamic Roasted Berries

Egg rich, ultra-thin pancakes, served with Greek yogurt and balsamic roasted berries.
Prep Time20 minutes
Cook Time30 minutes
Total Time50 minutes
Course: Breakfast, Dessert
Cuisine: French
Keyword: crepe, Eggy
Servings: 4

Ingredients

Basic Crepes

  • 2/3 cup whole wheat pastry flour can use white whole wheat or all-purpose
  • 1/4 tsp salt
  • 2 large eggs, well beaten
  • 1 cup milk or alt milk
  • 1 tbsp neutral flavored oil I use avacado
  • oil, for the skillet

Balsamic Roasted Berries

  • 1 lb berries I used strawberries and blueberries
  • 2 tsp olive oil
  • 2 tsp balsamic vinegar
  • 2 tsp brown sugar
  • 1 1/3 cup Greek yogurt to serve
  • 1/4 cup sliced almonds, toasted

Instructions

Basic Crepes

  • Combine the flour and salt in a medium bowl. In separate bowl, combine the beaten eggs, milk and oil. Add all at once to the flour mixture, then whisk until smooth. This can also be done in a blender.
  • Heat a well seasoned 8-inch cast iron skillet or similar sized non-stick skillet over medium heat, then brush lightly with oil. For each crepe, pour a scant 1/4-cup of batter into the skillet, then quickly rotate the pan to swirl the batter and cover the bottom. Cook for around a minute, until the edges begin to crisp and pull up from the edge of the skillet. Using a thin pancake turner, insert under the edge and push gently to the middle. Quickly flip and cook briefly to brown the other side. Remove to a plate, and repeat until all the batter is used.

Balsamic Roasted Berries

  • Preheat the oven to 350 degrees F. Pour the berries onto a sided sheet pan. Drizzle with the olive oil and balsamic vineger, then sprinkle with the brown sugar. Combine well to coat the berries. Place them into the oven and roast for 20-30 minutes, until the berries are soft and juices have released. Remove.

Serving

  • In a medium bowl, combine the Greek yogurt with about one third of the roasted berries. Use this to fill the crepes, roll up and place on serving plates, two per serving. Top with the remaining berries and sprinkle with toasted almonds.

Almond Sugar Cream Pie

Almond Sugar Cream Pie

Okay. I hate messing with family recipes that are so unhealthy they show little potential for redemption. Whatever might that recipe be, you ask. “Sugar Pie” is pretty self-explanatory, wouldn’t you think? This pie basically consists of a sugar/flour/butter mixture with vanilla cream poured atop, then baked until set, but still richly creamy. A bit like the filling of a nut pie, just without the nuts. I gather that Mom justified the whole thing on her practice of substituting evaporated milk for the cream, since that would somewhat cut the fat. Like it needed more fat; it was basically streusel ensconced in fat laden piecrust… if only it wasn’t so damned delicious. Sigh.

Not only does it taste wonderful, it’s also a pie with great history. Also known as sugar cream pie, it has heritage with the Quakers, Shakers, Amish and even with the Quebecois. This pie definitely got around, though the state of Indiana claimed it in 2009 as its official state pie, renamed Hoosier Sugar Cream Pie. Supposedly the Amish and Shaker communities baking the pie were living in Indiana in the 1800s. How it got to Quebec is beyond me! (That version unsurprisingly uses maple syrup.) It does seem that the recipe might have originated just about anywhere, given that it was easily made with pantry staples and decidedly satisfied the sweet tooth. Yes, I suspect this innocent pie was probably at the root of more than a few cavities…

So all I really needed to do was cut the fat and sugar, right?? Problem is, that’s most of the pie… once done, the ingredient list is so short there’s no way for it to fill a piecrust. So-o-o, some substitutions were in order. Almond flour seemed a logical candidate to replace a major portion of the sugar, offering up a tasty balance of protein and healthier fat, while actually being a whole plant food. Cut both the butter and sugar by about two-thirds, bump up the flavor with spices and brandy, (you knew the booze would be in there somewhere) and finish it off with one’s choice of creamy milk product. While I tried lactose free half and half, options would include the aforementioned evaporated milk, light coconut milk and perhaps even oat milk. Getting a little carried away, I topped it with the blackberries I had in the fridge, and was amazed at what came out of the oven! Beautifully full and browned, with a lovely circular pattern of berries on top. Still rich in flavor, but lightly sweet with a moist crumbly texture and the tart sweetness of the fruit.

Was it anything like Mom’s sugar pie? Well, no, but this pie was something delectably new and different! Except it wasn’t, really. Delectable, yes. New and different? Uh…No. Somehow I later came to discover that I had actually baked an eggless French Frangipane tart, the British version being the Bakewell tart. https://en.wikipedia.org/wiki/Frangipane

I concluded there were two ways to look at this. One way would be to credit myself with the creativity to reinvent the wheel. The other would be to admit that it takes a clueless American to be so unfamiliar with said ethnic baked treasures from other cultures. But I figure in the big picture, it hardly matters. An almond sugar cream pie is still a mighty fine pie. As to the sugar pie recipe? It’s still peeking at me accusingly from the recipe box. Back to the drawing board. 

Sweet Almond Pie

Delicious almond pie, lightly sweet with a rich crumbly texture and flavor notes from spices and brandy.
Prep Time30 minutes
Cook Time35 minutes
Total Time1 hour 5 minutes
Course: Dessert
Cuisine: American, French
Keyword: almond, pie
Servings: 8 people

Ingredients

  • 2 tbsp flour, heaped
  • 1/2 cup almond flour
  • 1 tbsp butter
  • 1/3 cup sugar
  • 1/2 tsp anise seed
  • 1/4 tsp cinnamon
  • 7/8 cup light ½ and ½  3/4 cup + plus 2 tablespoons
  • 2 tbsp brandy
  • 1 tsp vanilla
  • 1/2 pint Blackberries, halved
  • 1 8-inch prepared pie shell

Instructions

  • Preheat the oven to 400° F. 
  • Mix the flours, butter, sugar, anise seed and cinnamon to fine crumbs, using a pastry cutter or food processor. Reserve 2 tablespoons, and spread the remainder in the 8-inch pie shell. Stir together the ½ and ½, brandy and vanilla. Carefully pour the liquid mixture over the filling in the pie shell. Spread lightly to cover. Press the berry halves lightly into the filling. Sprinkle reserved crumb mixture over top and bake for 8 minutes. Reduce the oven temperature to 350° F. and bake for an additional 25-30 minutes, til set and lightly browned on top.
  • Remove to a cooling rack and cool before slicing. 

Cranberry Walnut Chocolate Biscotti

Cranberry Walnut Chocolate Biscotti

“Don’t mind me, I’ll just be over here making everything magical and shit.”http://www.Tinybeans.com

Memes like this one are popular in the month of December. While sarcastically comical, I’m going to suggest that they hold a great deal of truth. They usually imply that Mom is the production manager for the holiday, but I’d argue that it’s dads, too. On the farm, Daddy was annually elected to head out and find a tree, then schlep it home using clips and ropes to “magically” hold it on the top of the car. And while Mom was the tree-side director, it was still his job to climb up the tree and evenly disperse and attach the Christmas lights prior to all of us hanging bulbs, Ivory Soap “snow,” and tinsel. No small feat, that.

Mom was the indisputable producer of Christmas kitchen magic, though. While this encompassed a wide range of rich and delicious dishes, today I’m looking at you, Christmas cookies. And some of these masterpieces weren’t even for consumption. We spent a raucous evening each year decorating cutout sugar cookies to be hung on a small tabletop Christmas tree. The competition for best cookie decorator of the year was intense. When it came to the cookies that would be eaten, there might have been one or two standards, but Mom was always up for trying the year’s new holiday trends in cookie baking. As I peruse her/my recipe file, I see classics like butterscotch shortbread, buttery thumbprints, molasses butterballs, Mexican wedding cakes, etc. etc. There is a theme here and it’s all about the butter… which my mom most decidedly loved.

Given that I’m trying to improve my blood test results, my use of butter in this past year has plummeted by about 75%. So at least some of the cookie joy this year had to come from a butterless cookie. Cue the olive oil… again…

I’ve raved about the virtues of the Italian cookie before, so I’ll spare you. But the history! Something else entirely. Biscotti are the great great grandmother of all Italian cookies. The word means literally “twice baked.” Because they bake twice, they become dry and crisp, allowing them to be stored for periods of time. The idea dates back to the Roman legions, which carried a twice-baked bread, probably similar to today’s rusk, on their various conquests. The sweetened biscuit I’m sharing today, however, is much more like the almond biscuits originating in the Tuscan city of Prato. But we are still talking 14th century. These crunchy little biscuits have been around for a while! Biscotti are sometimes baked using butter, sometimes with oil, and other times with no fat other than that included in the yolk of multiple eggs. But of course, I’m baking them with olive oil. 

This recipe makes a boatload of biscotti, which is fine by me, as they freeze beautifully and last a while. Prepared with all wheat flour they are more cookie like, made with part almond flour they are Italian to the core. The latter version produces crusty crunchy biscotti filled with little nooks and crannies. Some of those little spaces are filled with the fruit, nuts and chocolate. Pastry chefs might like to dip or coat their biscotti in melted chocolate, but let me think… do I need an additional task after I’ve baked these babies twice? No… I am just folding slivers of chocolate right into the dough. Once baked, these are my cookies of choice to dip into my daily post lunch cappuccino. Yes, I know; you can tell that retirement here is tough work. (Not.)

Given that it’s time for the New Year, you’ve most probably already overdosed on Christmas cookies; you may be preparing resolutions to rid yourself of this year’s accumulation, actually.  So clip/save this recipe for a time that you’d like to sit back and put your feet up with coffee and a cookie. That time will come ‘round before you know it. 

Cranberry Walnut Chocolate Biscotti

Crunchy Italian twice baked cookie with dried fruit, nuts and chocolate
Prep Time30 minutes
Cook Time35 minutes
Total Time1 hour 5 minutes
Course: Dessert
Cuisine: Italian
Keyword: biscotti, chocolate, cranberry, walnut
Servings: 4 dozen

Ingredients

  • 1/3 cup dried cranberries
  • 2 tbsp Grand Marnier or other orange liqueur
  • 1/3 cup olive oil
  • 1/2 tsp fiori di sicilia may substitute vanilla + 1 tsp orange zest
  • 2 large eggs
  • 1 3/4 cup whole wheat pastry flour or 1 1/4 cups flour + 1/2 cup almond meal
  • 1/4 tsp salt
  • 1 tsp baking powder
  • 1/2 cup finely chopped walnuts
  • 1 oz dark chocolate, finely shaved

Instructions

  • Preheat the oven to 350° F. Line a standard cookie sheet with parchment paper.
  • Macerate the cranberries in the Grand Marnier while preparing the dough.
  • Pour the olive oil into the work bowl of a stand mixer. With the mixer running medium low, gradually add the sugar and beat til well mixed. Add the extract, then the eggs, one at a time. Beat til well mixed and fluffy.
     
  • Combine the flour, salt and baking powder. With mixer at low speed, add gradually to the creamed mixture until soft dough forms. Mix in the cranberries, walnuts and slivers of shaved chocolate thoroughly. 
  • Using half the dough, shape into 2 logs on the cookie sheet, each approximately 2 ½ inches wide, and 10 inches long. Bake the biscotti for 20-25 minutes, til the logs are firm and beginning to brown. Remove from the oven and allow to cool for several minutes. Use a spatula to maneuver the logs, one at a time onto a cutting board. Slice the logs on the diagonal, making slices about 3/8 inch wide. Return the individual slices to the baking sheet as you cut them. When both logs are sliced and on the cookie sheet, return the sheet to the oven for about 10 minutes. Remove them from the oven and transfer to a cooling rack. 
     

Notes

Serving Size: 1 biscotti
Calories: 52
Total fat: 2.7 grams, .04 grams saturated
Total carb: 6 grams, .05 grams fiber, 4.1 grams added sugar
Protein: 1.1 grams

Homemade Applesauce

recipe image
Applesauce with cream and chopped nuts

Early fall meant applesauce, an all-day epic endeavor.  It was the final hot, steamy preservation project of the year, thankfully. Mom was quite particular about her applesauce, made with yellow transparent apples. Don’t bother suggesting any other variety to her, it was yellow transparent or bust.  Fortunately, my Dad’s cousin Fran had a large grove of yellow transparent apple trees, or it would have been bust.  Fran was delighted to see us, for those trees produced more than they could possibly use.  

The transparent was the palest of green/yellow apple with a crisp white interior. High in acidity, these apples were decidedly not for eating raw, but made incredible applesauce. Mom had a vintage applesauce strainer with a long wooden pestle. The apples were washed, cut into pieces and cooked down to a creamy consistency in a bit of water. Once soft, they were reamed through the strainer, pressing all the pulp through, the peels and seeds left behind. The hot applesauce had to be sweetened just so, after which it was cooled. Packed into plastic bags and cardboard cartons, we filled the freezer, for it was one of our main sources of fruit in the winter. Mom’s favorite way of serving her applesauce was partially thawed, leaving it icy cold with frozen bits of sweetness. It was delicious.

Once off the farm, serving applesauce left me to the mercy of the grocery store…   

It obviously was someone’s job to search for the worst possible apple varieties, because while the label said “applesauce,” that stuff was decidedly mediocre. That’s actually giving it more credit that it was due… Its consumption was resigned to the years in which we were starting solid foods to our babies. Poor kids!

One of our babies grew enough to attend kindergarten at the local public school. Where his inspired teacher made applesauce with the kids, after which they wrote about the experience. By popular demand she sent the recipe with the students to make at home. Her name is withheld to protect the innocent, but the recipe was titled Mrs. _______’s Lumpy-Bumpy Applesauce. This sauce was absolutely nothing like Mom’s, yet it was absolutely yummy. Chunky rather than smooth, but well balanced and full of flavor, with no transparent apples in sight. 

Turns out the key is using a mix of several different varieties of apple. Since each combination is unique, it’s important to adjust the amount of sweetening to taste. I like to cook the apples with the peel, then strain it in my food mill, which keeps the lumpy bumpy consistency and provides a beautiful pink color, though if peeled the whole straining process can be skipped. Depth of flavor develops with the addition of cinnamon, citrus and a dollop of yes, brandy. Which I suppose you could omit, if you really need to. But I wouldn’t… While this applesauce is delicious on its own, drizzling with a spoonful of cream and a sprinkle of toasted nuts puts it in dessert territory.  Mom wouldn’t recognize it, I suppose, but she might still like it…

Sometimes I need to remind myself. Homemade is best. 

recipe image
Print Recipe
5 from 1 vote

Homemade Applesauce

Sweet-tart applesauce with notes of cinnamon and brandy.
Prep Time1 hour
Total Time1 hour
Course: Breakfast, Dessert, Side Dish, Snack
Cuisine: American
Keyword: apples
Servings: 6

Ingredients

  • 4 large apples  I like a mix of Gala, Fuji and Pink Lady
  • 3/4 tsp cinnamon
  • 1 tbsp brandy
  • 1 medium lemon, juice and zest
  • 1/2 tsp vanilla
  • 2-4 tbsp honey
  • 1/4 cup cream optional
  • 1/4 cup nuts, toasted and chopped optional

Instructions

  • Wash, quarter and core the apples. Cut the quarters into several pieces and place into a large saucepan with ½ cup water. Bring to a boil, cover and reduce heat to simmer. Cook the apples for 15-20 minutes, until soft. Allow to cool slightly.
     
  • Turn the apples and liquid into a reamer or food mill, turning until the pulp is strained through and peel is left behind. Return the apple puree to the saucepan and add the cinnamon, brandy, lemon juice and zest, and vanilla. Begin with 2 tablespoons of honey, stir and taste. If the sauce is too tart, continue to add honey and taste until desired level of sweetness is reached
  • To serve as dessert, drizzle each serving with the optional cream. Sprinkle with chopped nuts.

Notes

To skip the straining step, simply peel and core the apples prior to cooking.